> For the complete documentation index, see [llms.txt](https://lfdocs.lookingglassfactory.com/llms.txt). Markdown versions of documentation pages are available by appending `.md` to page URLs; this page is available as [Markdown](https://lfdocs.lookingglassfactory.com/software/looking-glass-studio/studio-2.md).

# Studio 2.0 Alpha

Use Looking Glass Studio to turn photos and videos into holograms, edit your media, organize playlists, and sync to a Looking Glass Go or Portrait.

## Download application

This guide covers the Studio 2 desktop alpha. Controls and device support may change between builds.

{% hint style="info" %}
[**Sign up for the alpha here.**](https://forms.gle/ac2bJXQoebWNZmLV7) Note that we distribute the app on a rolling basis so you will not get access immediately - it can take a few days to receive access.
{% endhint %}

<figure><img src="https://2252206271-files.gitbook.io/~/files/v0/b/gitbook-x-prod.appspot.com/o/spaces%2FPuCaeVAli72TiclYlEG5%2Fuploads%2Fgit-blob-f19d7ef375d8e58160585137eb85048f843ab8da%2Fdivider.png?alt=media" alt=""><figcaption></figcaption></figure>

## Overview

Looking Glass Studio is for creating and playing holograms on Looking Glass light field displays. You can import photos, videos, and existing holographic media, adjust how they look, organize them into playlists, and sync supported content to a connected Go or Portrait for standalone playback.

This guide walks through the basic workflow:

* Import photos, videos, or existing holograms
* Let Studio convert ordinary photos and videos into media with depth
* Edit the resulting holograms
* Organize media into playlists
* Play media on a connected light field display
* Sync media to a Go or Portrait for playback without your computer
* Configure a Go's Wi-Fi connection and switch between cloud and local playback

{% hint style="info" %}
Studio 2 works with **light field displays**. For a 7-inch musubi frame, use the [musubi app](https://hlddocs.lookingglassfactory.com/apps-and-tools/musubi-app). To prepare video for a larger Hololuminescent Display, use [HLD Author](https://hlddocs.lookingglassfactory.com/apps-and-tools/hld-author).
{% endhint %}

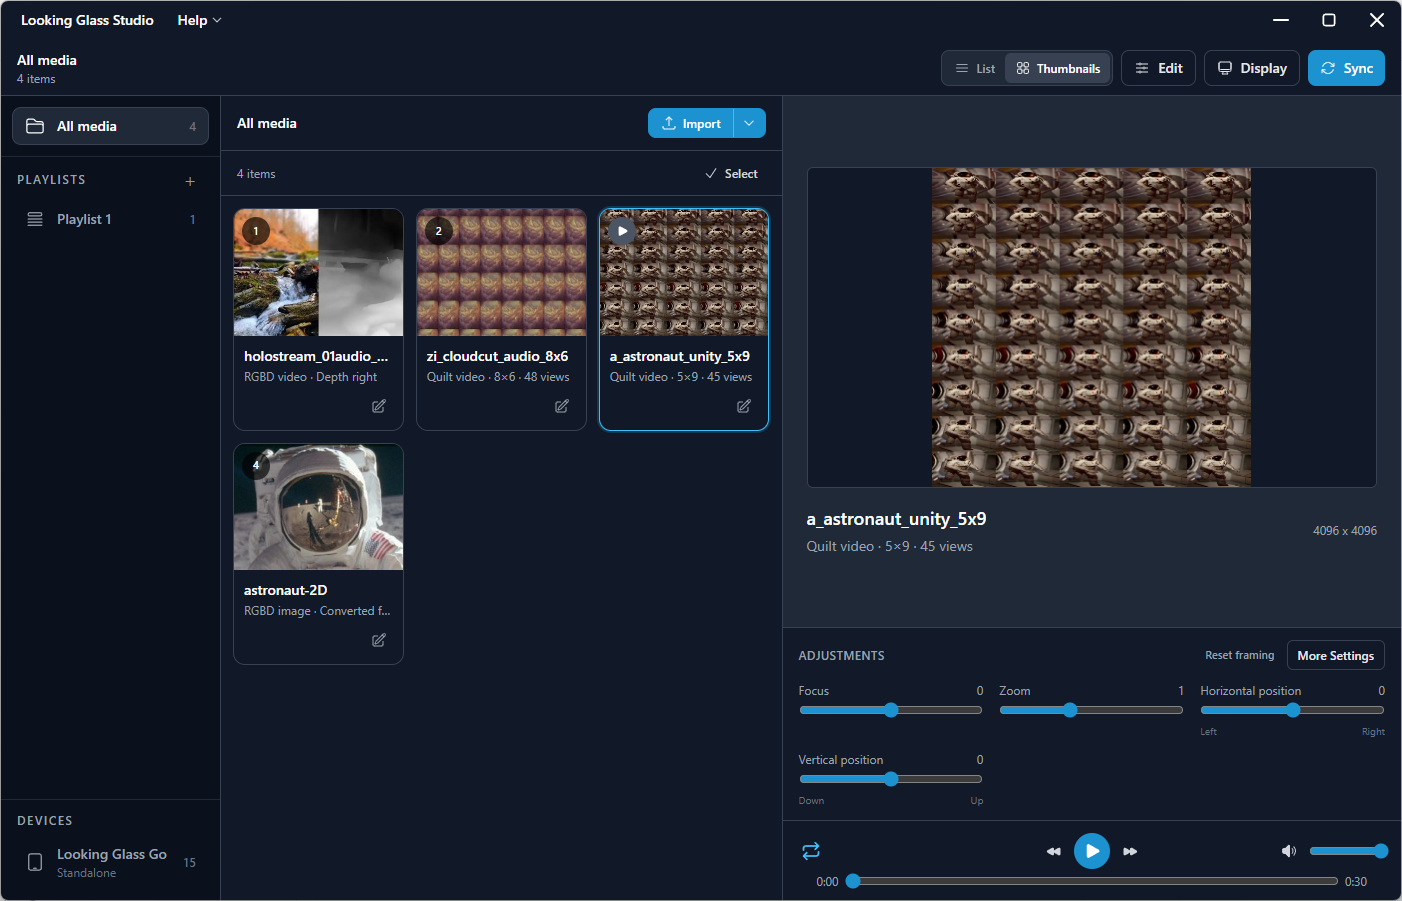
<figure><img src="https://2252206271-files.gitbook.io/~/files/v0/b/gitbook-x-prod.appspot.com/o/spaces%2FPuCaeVAli72TiclYlEG5%2Fuploads%2Fgit-blob-c61defe3300cd3c094ca9a2db730bafb909ab809%2Fstudio2-thumbnailview.png?alt=media" alt="Studio in Thumbnails view with RGBD and quilt media, a playlist, a connected Go, and a selected astronaut quilt video"><figcaption><p>The main UI for Looking Glass Studio in Thumbnails view. Media, playlists, and connected devices are on the left; the selected media and its adjustments are on the right.</p></figcaption></figure>

<figure><img src="https://2252206271-files.gitbook.io/~/files/v0/b/gitbook-x-prod.appspot.com/o/spaces%2FPuCaeVAli72TiclYlEG5%2Fuploads%2Fgit-blob-f19d7ef375d8e58160585137eb85048f843ab8da%2Fdivider.png?alt=media" alt=""><figcaption></figcaption></figure>

## What you'll need

* The Looking Glass Studio desktop app
* Photos, videos, or existing holographic media to import
* A Looking Glass light field display to view the result in 3D
* The power, USB, and video connections required by your display

You can import and organize media before connecting a display. To view it on your Looking Glass, follow the setup guide for your model in the [light field display docs](https://lfdocs.lookingglassfactory.com/).

### Computer requirements

Looking Glass Studio is available for Windows PCs and Apple silicon Macs. Studio uses your graphics hardware both to convert photos and videos locally and to render the multiple views needed for a light field display. Smooth playback requires reasonably powerful graphics performance.

We recommend the following:

| Component        | Windows                                                                               | Mac                                                                                           |
| ---------------- | ------------------------------------------------------------------------------------- | --------------------------------------------------------------------------------------------- |
| Operating system | Windows 11 recommended; Windows 10 supported                                          | macOS 15 or newer                                                                             |
| Processor        | 64-bit Intel or AMD processor                                                         | Apple M1 or newer                                                                             |
| Memory           | 16 GB RAM or more                                                                     | 16 GB unified memory or more                                                                  |
| Graphics         | Dedicated graphics card with NVIDIA GeForce RTX 2060-class performance or better      | Built-in Apple silicon graphics; a Pro or Max chip is recommended for heavier video workloads |
| Storage          | SSD with space for your original media, converted files, and prepared display content | SSD with space for your original media, converted files, and prepared display content         |

The current builds are Windows x64 and macOS Apple silicon only. Intel Mac and native Windows ARM builds are not currently available.

**Using a less powerful computer**

Computers with 8 GB of memory or recent Intel or AMD integrated graphics may work for lighter tasks, but conversion can take longer and live hologram playback may be less smooth.

**Working with video and larger displays**

For frequent video conversion, high-resolution content, or playback on larger Looking Glass light field displays, we recommend 32 GB of memory and a more powerful GPU. Playback performance also depends on the source resolution, frame rate, and video codec.

For live playback, your computer’s video output, cable, and adapter must support the connected Looking Glass display’s required resolution. Check your display’s setup guide for connection requirements.

**Graphics settings and troubleshooting**

Keep your graphics drivers up to date. Local AI conversion requires working WebGPU support, and hologram rendering requires WebGL 2 support.

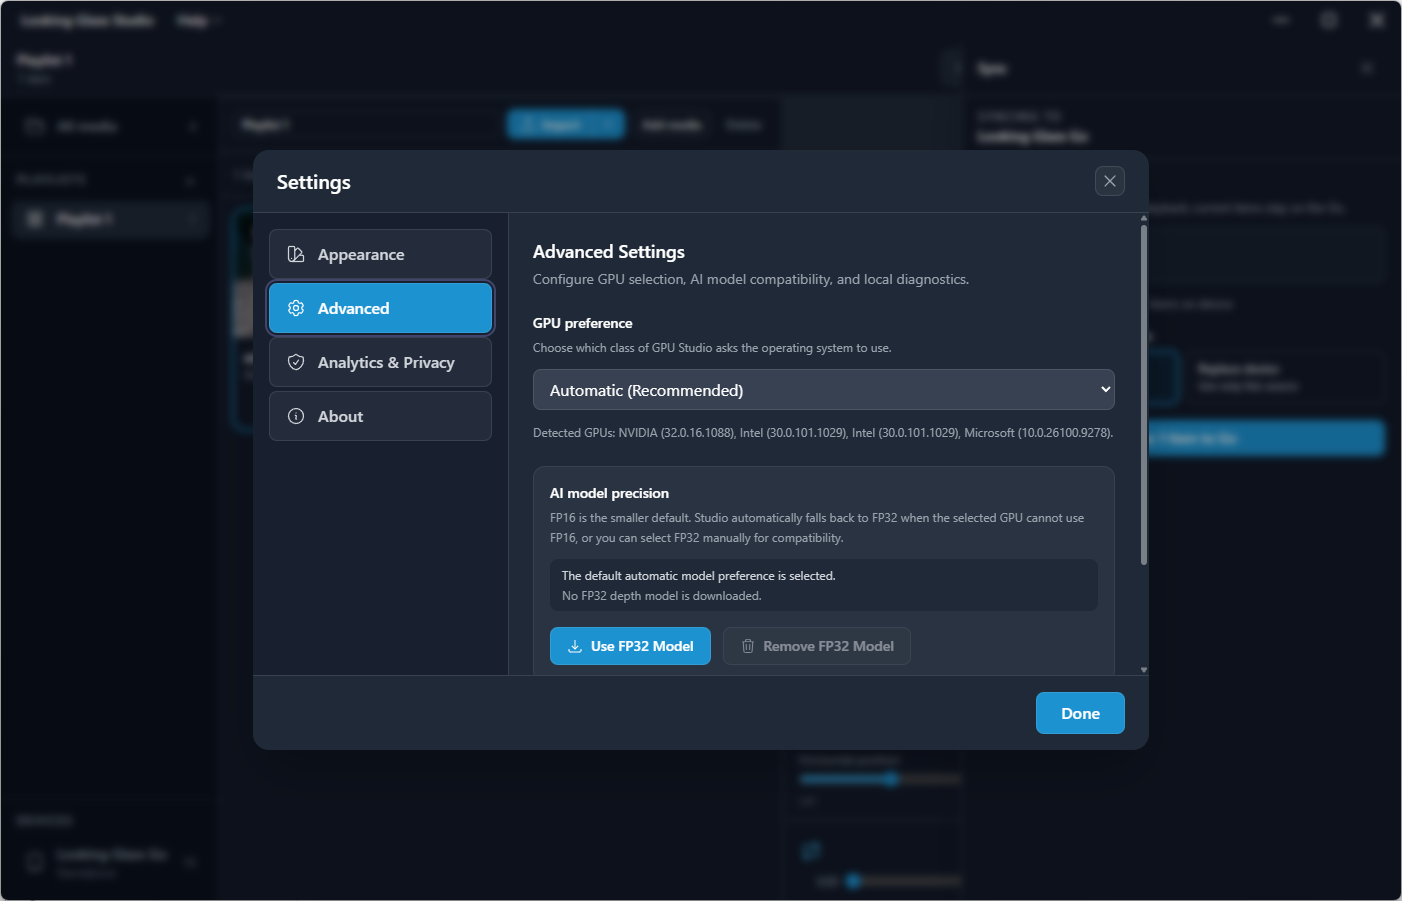
If your Windows computer has both integrated and dedicated graphics and performance is poor, open **Help > Settings > Advanced**, set **GPU preference** to **High Performance**, and restart Studio.

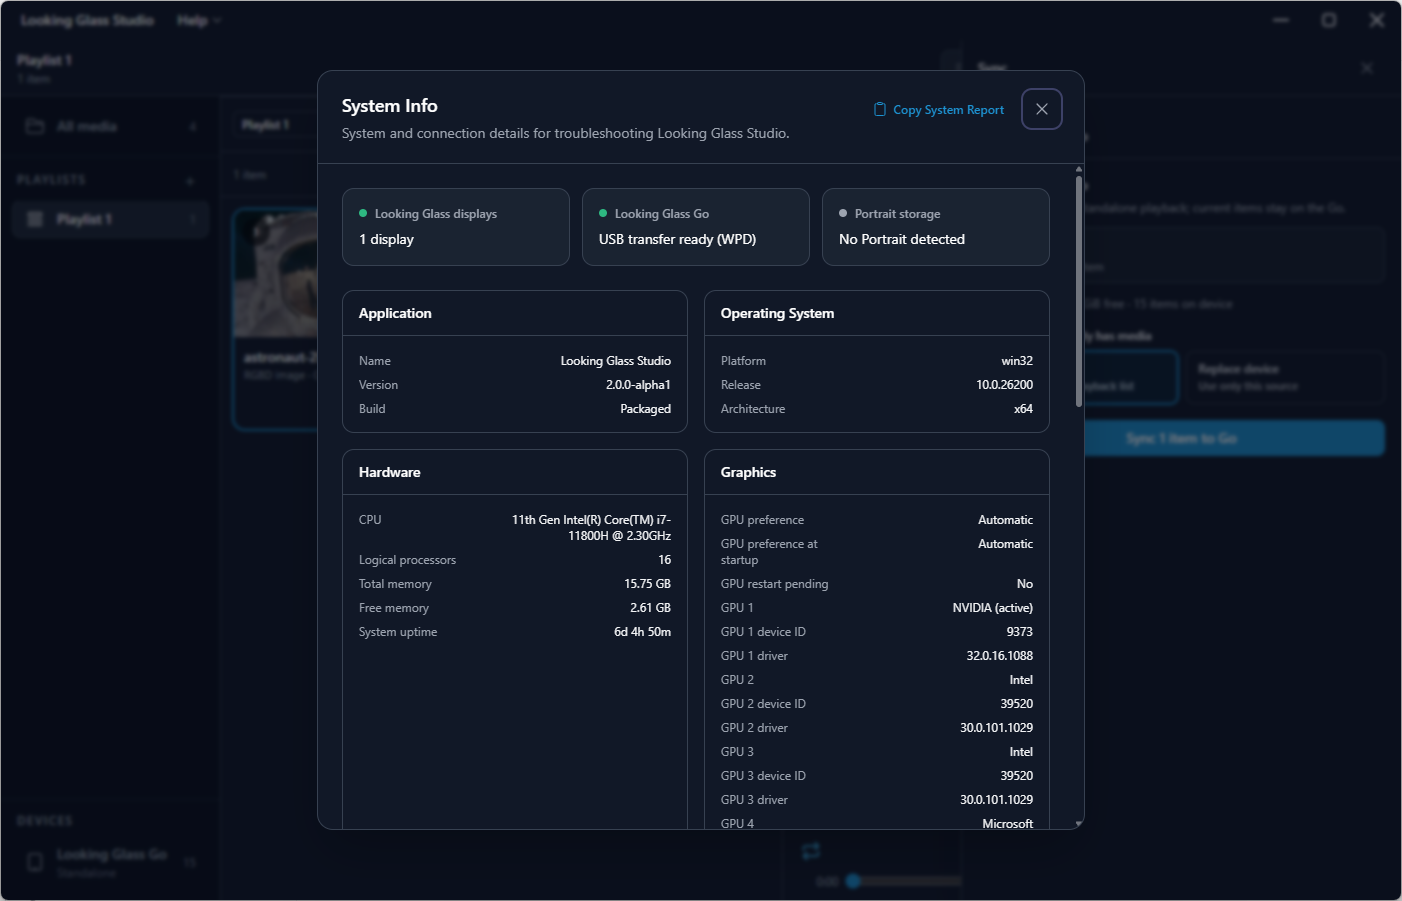
Open **Help > System Info** to review your operating system, graphics hardware, and display connection details when troubleshooting.

### Source media

| Media type                 | What to import                                                                        |
| -------------------------- | ------------------------------------------------------------------------------------- |
| Ordinary photos and videos | 2D media that Studio can convert into RGBD, such as JPG/PNG photos and MP4/MOV videos |
| RGBD images and videos     | A color image or video paired with a depth map                                        |
| Quilt images and videos    | A grid of views of the same scene, prepared for a light field display                 |
| HOP files                  | Packaged holograms with media and settings                                            |
| Light field photosets      | **Experimental!** An ordered series of views of the same scene                        |

RGBD means color plus depth. A depth map describes which parts of the image are closer or farther away. A quilt contains multiple views instead. Studio uses this information to create the view on your light field display.

<figure><img src="https://2252206271-files.gitbook.io/~/files/v0/b/gitbook-x-prod.appspot.com/o/spaces%2FPuCaeVAli72TiclYlEG5%2Fuploads%2Fgit-blob-f19d7ef375d8e58160585137eb85048f843ab8da%2Fdivider.png?alt=media" alt=""><figcaption></figcaption></figure>

## Using Looking Glass Studio

1. Launch **Looking Glass Studio**.
2. Open **All media**.
3. Select **Import**.
4. Choose one or more media files.

You can also drag files into the media area. Use the arrow next to **Import** for **Photoset folder** or **Photoset view images** when importing a set of views as one hologram.

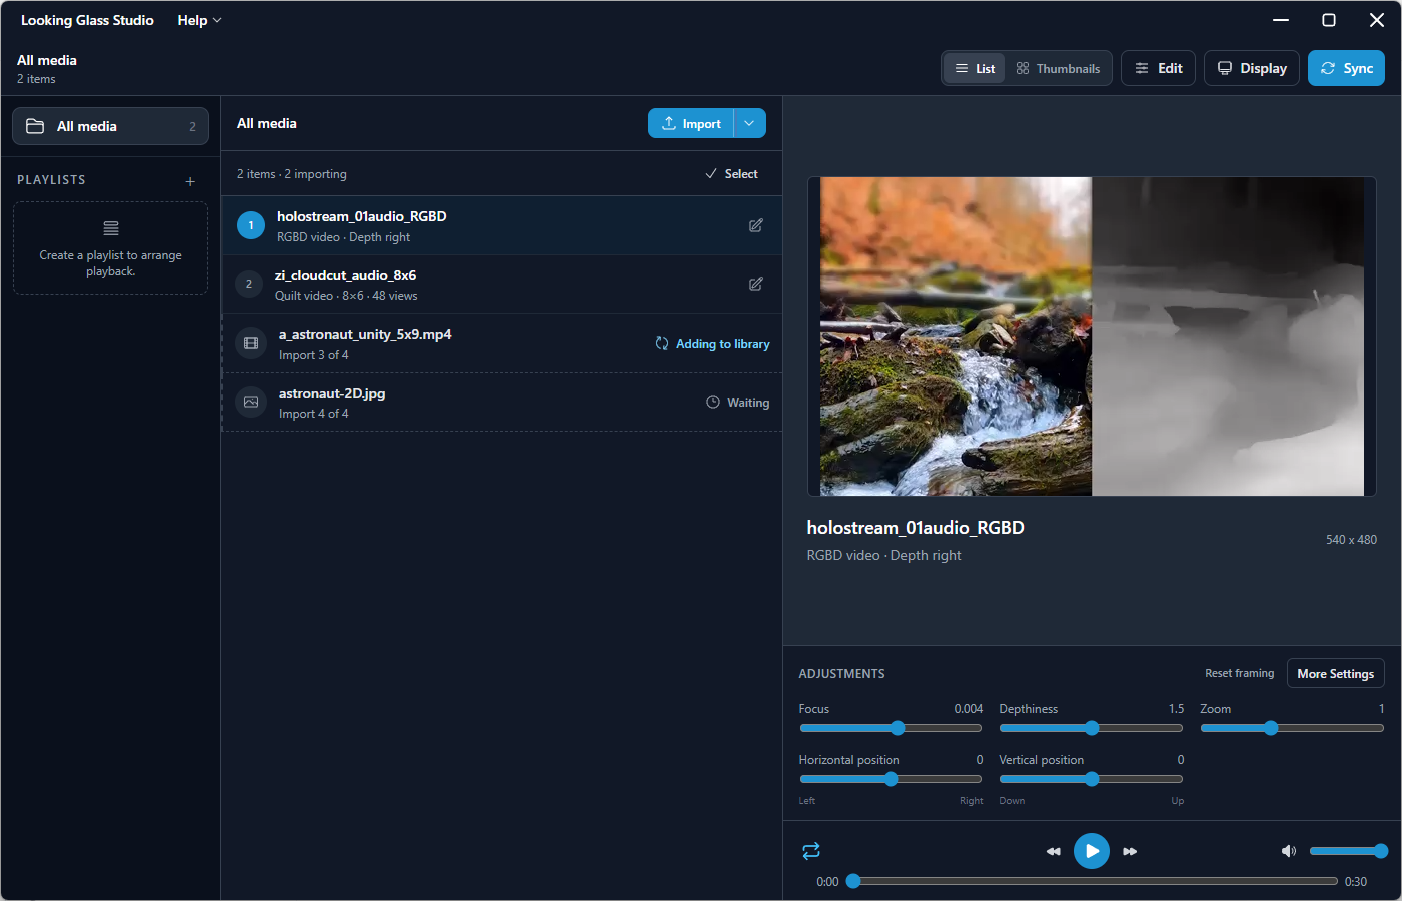
Studio inspects each file as it imports. Existing quilts and RGBD media use their original view or depth information. Ordinary 2D photos and videos are queued for local conversion to RGBD. Processing time depends on the media and your computer.

<figure><img src="https://2252206271-files.gitbook.io/~/files/v0/b/gitbook-x-prod.appspot.com/o/spaces%2FPuCaeVAli72TiclYlEG5%2Fuploads%2Fgit-blob-5e7452cb6e3c040496d5b6999ca7e744dc0eb68b%2Fstudio2-importprocessing.png?alt=media" alt="All media in List view with two imported videos, one file being added to the library, and a JPG waiting to import"><figcaption><p>Completed items appear in All media while the remaining files continue importing. The selected RGBD video shows its color image and depth map side by side.</p></figcaption></figure>

{% hint style="info" %}
Keep Studio open while media is importing or converting. Wait for an item to finish processing before syncing it to your display.
{% endhint %}

Choose **List** or **Thumbnails** to change how you browse the library. Select an item to inspect it in the preview area. Use the playback controls below the preview to play or pause, move between items, seek through video, adjust volume, or change repeat mode.

### Editing photos

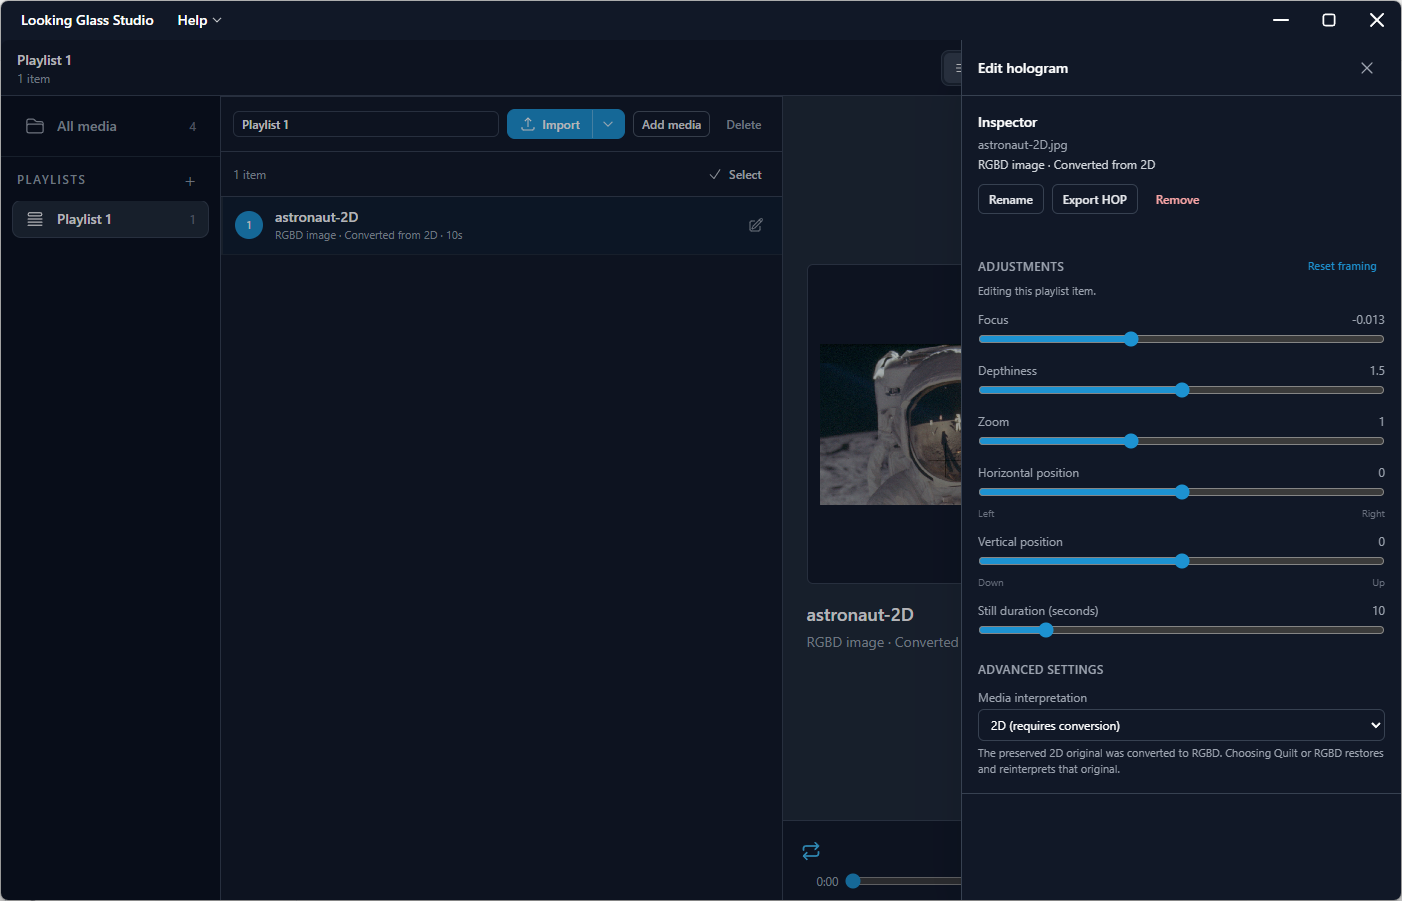
Select a photo to show its quick adjustments. Choose **Edit**, or **More Settings** below the preview, to open the full editor.

The available controls depend on the media type:

* **Focus**: adjust which part of the scene is most in focus
* **Depthiness**: adjust the strength of the depth effect for RGBD media
* **Zoom**: change the size of the content
* **Horizontal position** and **Vertical position**: move the content within the frame
* **Still duration (seconds)**: set how long a still image plays
* **Reset framing**: restore the default zoom and position

Studio saves adjustments as you make them. Check the result on your connected Looking Glass as you adjust focus and depth.

<figure><img src="https://2252206271-files.gitbook.io/~/files/v0/b/gitbook-x-prod.appspot.com/o/spaces%2FPuCaeVAli72TiclYlEG5%2Fuploads%2Fgit-blob-364cf7c0893f322220bb2e9cd0003bfed2d838da%2Fstudio2-editpanel.png?alt=media" alt="Edit hologram panel for an astronaut photo converted from 2D, showing focus, depthiness, framing, still duration, and media interpretation"><figcaption><p>Editing a converted photo in a playlist. The panel indicates that these adjustments apply to this playlist item.</p></figcaption></figure>

### Editing videos

Select a video and use the playback timeline to inspect different moments. **Focus**, **Zoom**, and position controls adjust its appearance; RGBD videos also have **Depthiness**.

### Checking how a file is interpreted

If a file looks wrong, open **Edit** and check **Advanced settings > Media interpretation**.

* Choose **Quilt** for a grid of views. Check its columns, rows, and view count against the source.
* Choose **RGBD** for color plus depth. Check **Depth position** so Studio knows where the depth map is located.
* Choose **2D** for an ordinary photo or video that needs conversion.

For imported RGBD media with reversed depth (i.e. black is near, white is far), **Invert depth** can swap which areas appear near and far. These advanced controls vary by media type; converted 2D content does not show every control available for an imported RGBD file.

<figure><img src="https://2252206271-files.gitbook.io/~/files/v0/b/gitbook-x-prod.appspot.com/o/spaces%2FPuCaeVAli72TiclYlEG5%2Fuploads%2Fgit-blob-f19d7ef375d8e58160585137eb85048f843ab8da%2Fdivider.png?alt=media" alt=""><figcaption></figcaption></figure>

## Organize playlists

Use playlists to group media and set its playback order.

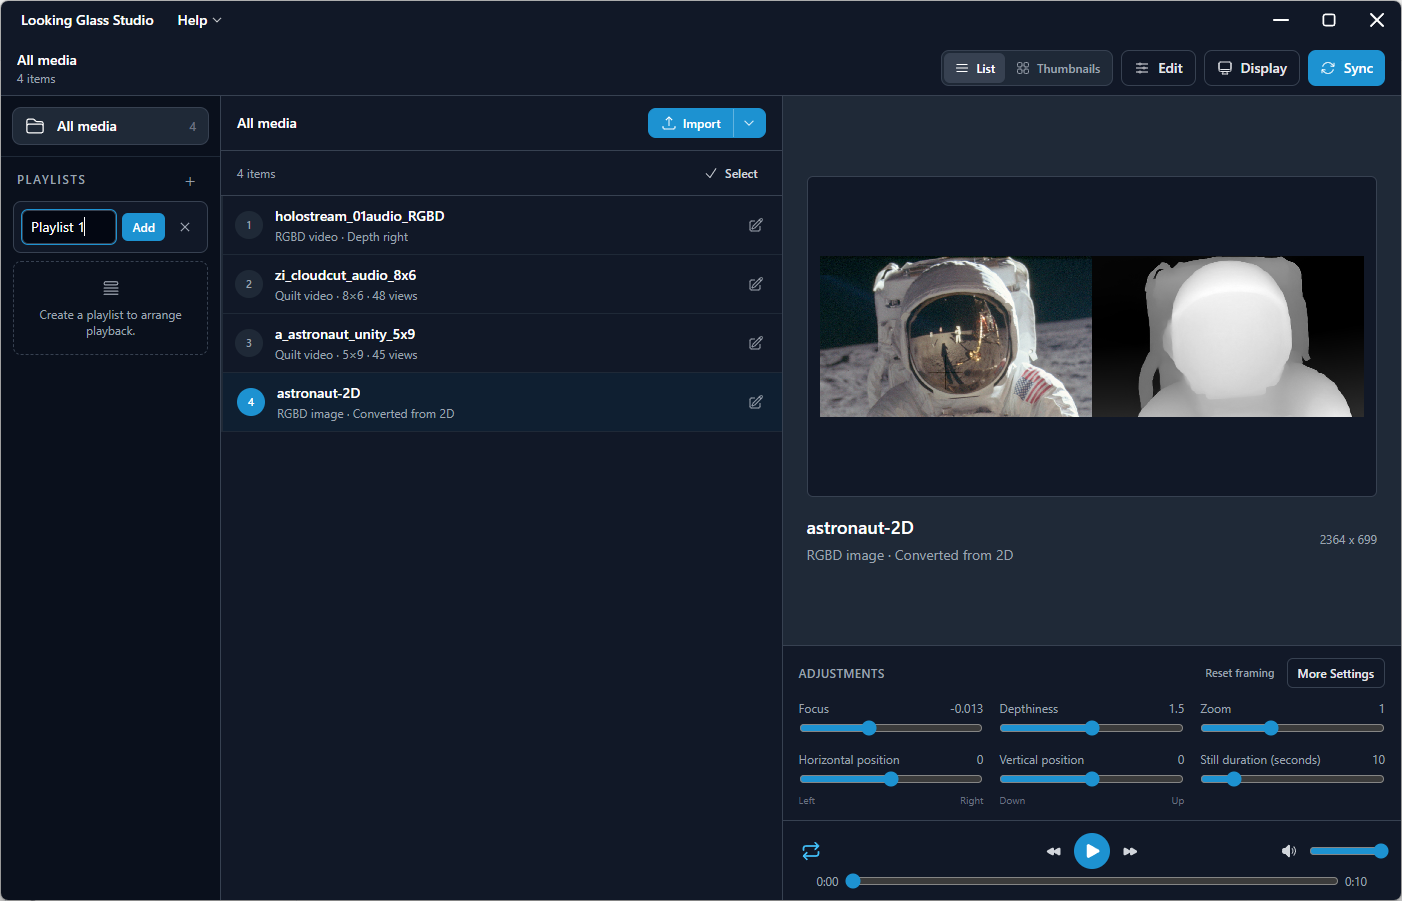
1. Select **+** next to **Playlists**.
2. Enter a name and select **Add**.
3. Open the playlist.
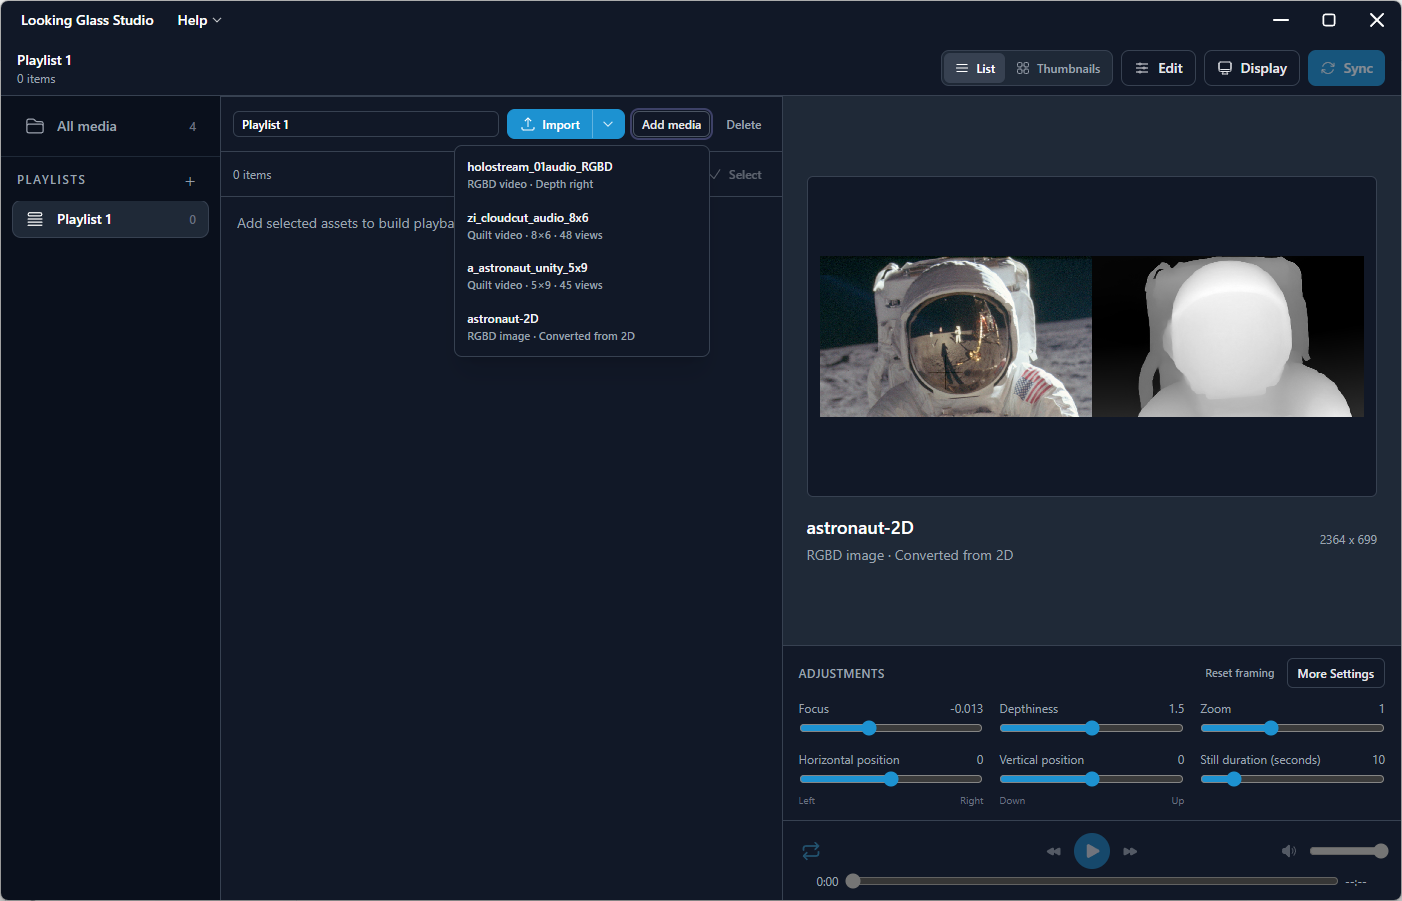
4. Use **Add media** to choose an item from your library, or **Import** to bring new files into the playlist.
5. Drag items into the order you want them to play.

<figure><img src="https://2252206271-files.gitbook.io/~/files/v0/b/gitbook-x-prod.appspot.com/o/spaces%2FPuCaeVAli72TiclYlEG5%2Fuploads%2Fgit-blob-70cd4162b8b8bb610c1b724c1e096bc7777f40c4%2Fstudio2-createplaylist.png?alt=media" alt="A new playlist name entered in the sidebar with the Add button beside it"><figcaption><p>Enter a name and select Add to create a playlist.</p></figcaption></figure>

<figure><img src="https://2252206271-files.gitbook.io/~/files/v0/b/gitbook-x-prod.appspot.com/o/spaces%2FPuCaeVAli72TiclYlEG5%2Fuploads%2Fgit-blob-22d34bb2ee2ebb99a1b685fba36f53b57ed38a54%2Fstudio2-addmediaplaylist.png?alt=media" alt="An empty playlist with the Add media menu open, listing RGBD and quilt assets from All media"><figcaption><p>Use Add media to choose an existing library item for your playlist.</p></figcaption></figure>

You can also drag library items onto a playlist in the sidebar from the **All media** view. Media imported into a playlist is available in **All media** as well.

Removing an item from a playlist does not delete it from your library. Removing the asset from **All media** removes it from Studio and from playlists that use it.

When the adjustment panel says **Editing this playlist item**, your framing changes apply to that occurrence in the playlist.

<figure><img src="https://2252206271-files.gitbook.io/~/files/v0/b/gitbook-x-prod.appspot.com/o/spaces%2FPuCaeVAli72TiclYlEG5%2Fuploads%2Fgit-blob-f19d7ef375d8e58160585137eb85048f843ab8da%2Fdivider.png?alt=media" alt=""><figcaption></figcaption></figure>

## Play on a connected Looking Glass

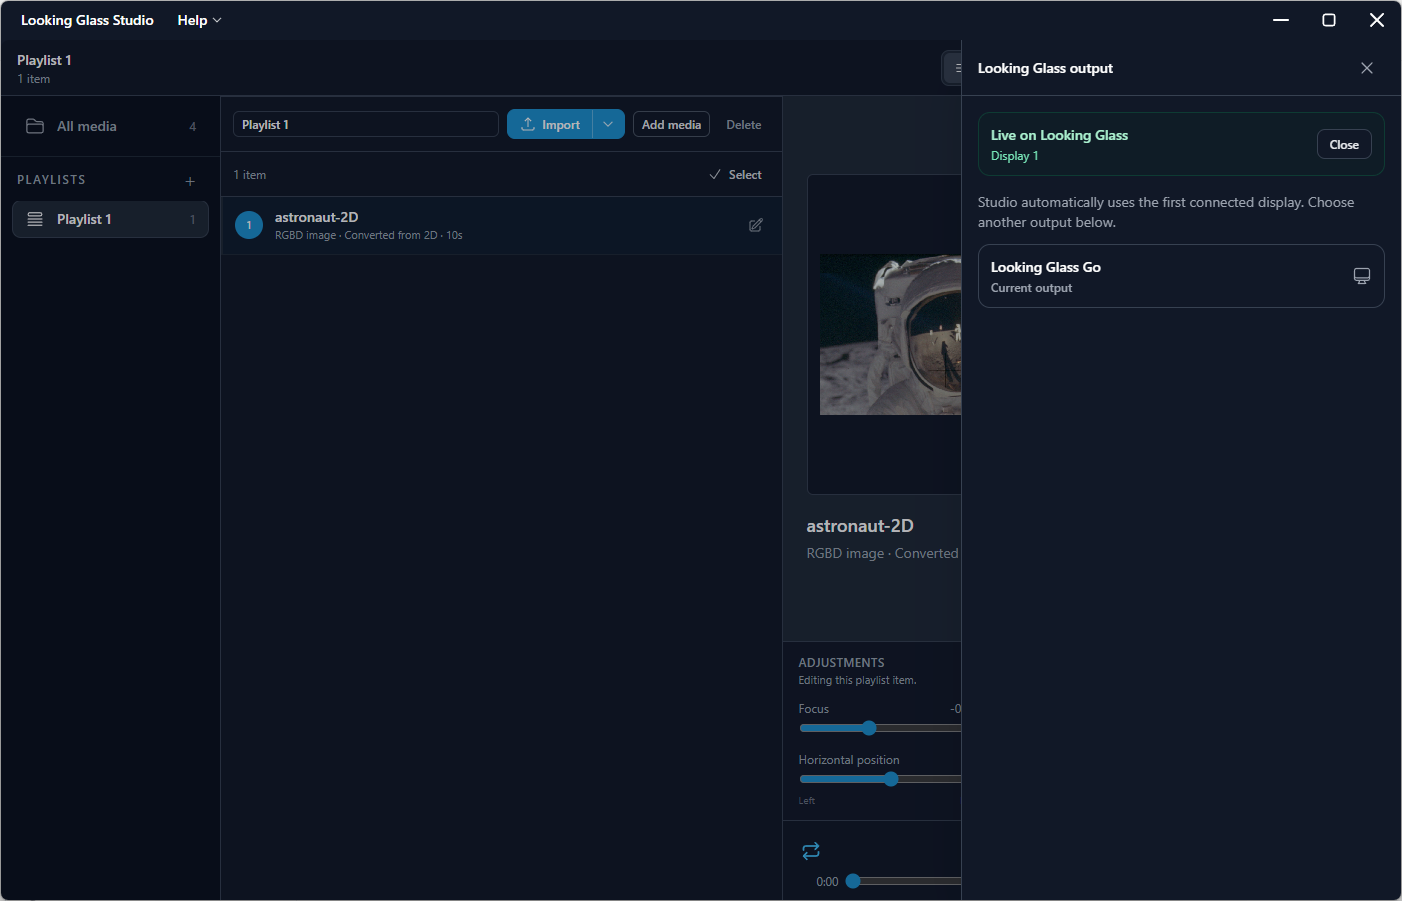
Use **Display** for live playback from your computer.

1. Power on your light field display and connect it for desktop use.
2. For Go or Portrait, set your device to be in [**Desktop Mode**](/getting-started/looking-glass-go/standalone-and-desktop-modes.md#desktop-mode).
3. Select media or open a playlist in Studio.
4. Open **Display** to check the selected output or choose another connected Looking Glass.
5. Use the playback controls to play your content.

Studio automatically uses the first connected display it detects. If there are no displays listed, it keeps checking in the background. Select **Connection details** for more information.

<figure><img src="https://2252206271-files.gitbook.io/~/files/v0/b/gitbook-x-prod.appspot.com/o/spaces%2FPuCaeVAli72TiclYlEG5%2Fuploads%2Fgit-blob-02e9f497e5dcc223645e6bb5826aa81a3a30c183%2Fstudio2-devicepanel.png?alt=media" alt="Looking Glass output panel showing Live on Looking Glass and a Go selected as the current output"><figcaption><p>The Display panel confirms that Studio is playing on the connected Looking Glass Go.</p></figcaption></figure>

<figure><img src="https://2252206271-files.gitbook.io/~/files/v0/b/gitbook-x-prod.appspot.com/o/spaces%2FPuCaeVAli72TiclYlEG5%2Fuploads%2Fgit-blob-f19d7ef375d8e58160585137eb85048f843ab8da%2Fdivider.png?alt=media" alt=""><figcaption></figcaption></figure>

## Sync to a connected Go or Portrait

Use **Sync** to prepare media for standalone playback on a Go or Portrait.

### Choose what to sync

Open the playlist you want to transfer, or use **Select** to choose specific items in **All media**. Then choose **Sync**. Check the source name and item count in the Sync panel before starting; syncing from All media without a selection will transfer the whole library.

### Looking Glass Go

1. Connect your Go to your computer using the included **USB-C-to-USB-C cable**, then power it on. USB-A-to-USB-C cables will not work with Go.
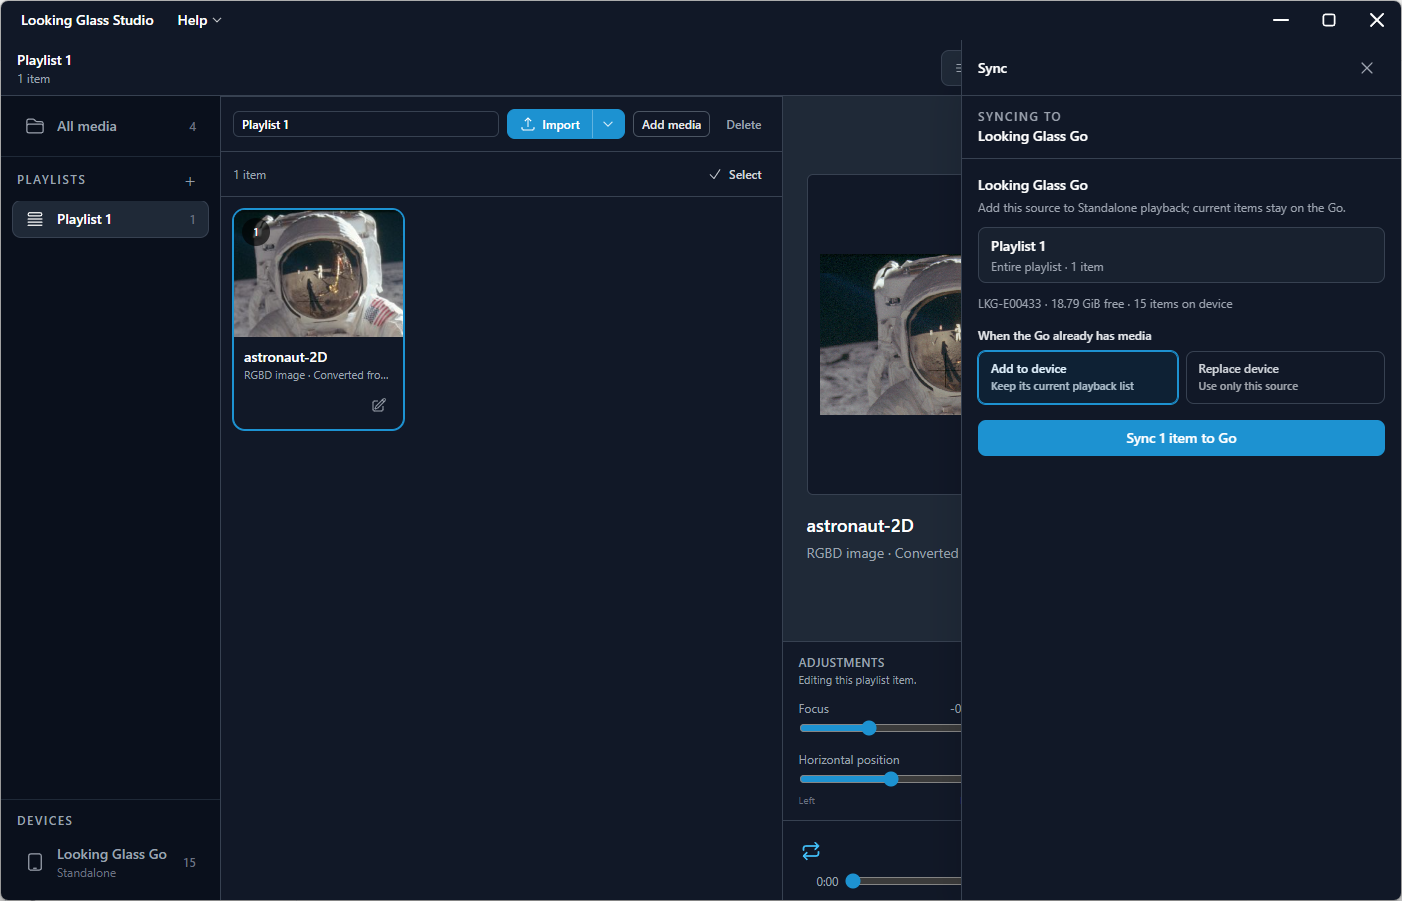
2. Open **Sync** and check that Studio detects the intended device.
3. Follow any preparation instructions shown by Studio. If it asks to prepare video, RGBD, or photoset media in **Desktop Mode**, complete that step before transferring.
4. Put the Go in the USB transfer mode requested by Studio.
5. Choose **Add to device** to keep its current playback list, or **Replace device** to use only the selected source.
6. Select **Sync … items to Go** and wait for preparation, copying, and finalization to finish.
7. After a successful sync, disconnect the computer and use standalone playback on the Go.

<figure><img src="https://2252206271-files.gitbook.io/~/files/v0/b/gitbook-x-prod.appspot.com/o/spaces%2FPuCaeVAli72TiclYlEG5%2Fuploads%2Fgit-blob-6647f448c930c15eb6e425a16da93c9d436a0b40%2Fstudio2-gosync.png?alt=media" alt="Go Sync panel with Playlist 1 selected, one item to sync, available device storage, and Add to device and Replace device options"><figcaption><p>Syncing a playlist to a connected Go. Add to device keeps its current playback list; Replace device uses only this source.</p></figcaption></figure>

### Looking Glass Portrait

Connect the Portrait by USB and open **Sync**. Use the scan control if prompted, check the source and destination, choose the desired add or replace behavior, then select **Sync to Portrait**. You can also choose whether to loop the standalone playlist.

If Studio detects an older Studio 1 playlist, it asks you to confirm taking it over. Read that message before continuing: this replaces the old standalone playlist and removes the media attributed to it after the new playlist is verified.

{% hint style="warning" %}
Keep the display connected until Studio reports that sync has finished. **Replace device** changes the standalone playback list to the selected source; use **Add to device** when you want to keep existing items.
{% endhint %}

<figure><img src="https://2252206271-files.gitbook.io/~/files/v0/b/gitbook-x-prod.appspot.com/o/spaces%2FPuCaeVAli72TiclYlEG5%2Fuploads%2Fgit-blob-f19d7ef375d8e58160585137eb85048f843ab8da%2Fdivider.png?alt=media" alt=""><figcaption></figcaption></figure>

## Configure your device

Open **Help > Configure Device** to change supported settings on a connected Looking Glass. For Go, this includes Wi-Fi setup, connecting to your Blocks account, and restoring a locally synced Studio playlist. This is useful if you have had trouble getting the Go online through the mobile app, or want to change its Wi-Fi network from your computer.

The available controls depend on the device and its firmware. Wi-Fi and Blocks setup are for Go; Portrait exposes supported automatic power-on settings.

### Connect to the device

1. Power on your Looking Glass and keep it connected to your computer over USB. For Go, use the included **USB-C-to-USB-C cable**; USB-A-to-USB-C cables will not work. Wait for Studio to detect it.
2. Open **Help > Configure Device** and check the device name and serial number.
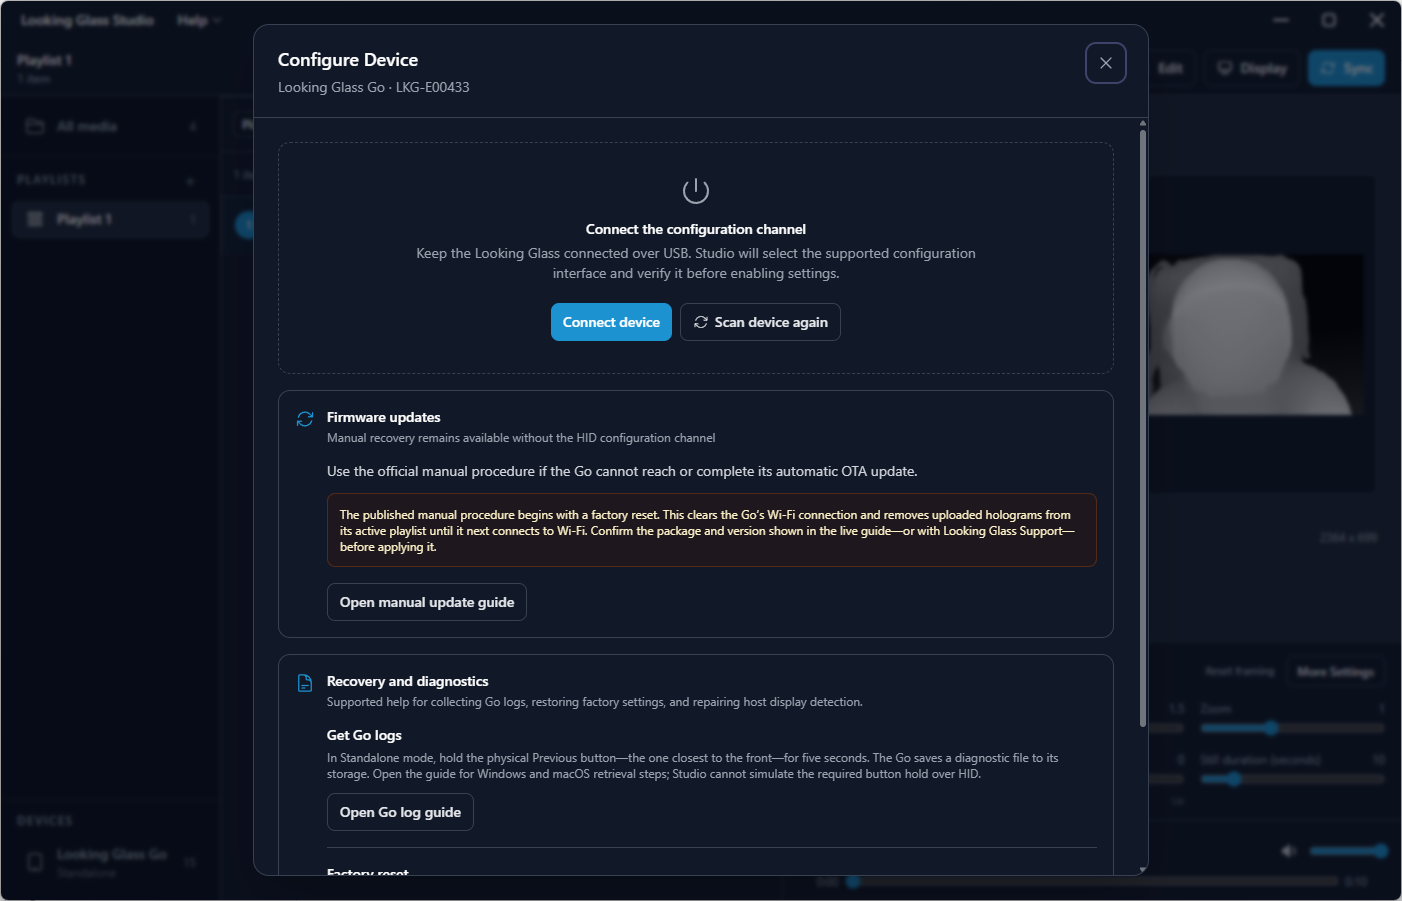
3. Select **Connect device**. If Studio has not found the device, use **Scan device again** and check the USB connection. If more than one device is connected and Studio cannot identify the intended one, disconnect the others and try again.
4. Wait for the connected-device banner and settings to appear. Use **Refresh** to read the current device status again.

<figure><img src="https://2252206271-files.gitbook.io/~/files/v0/b/gitbook-x-prod.appspot.com/o/spaces%2FPuCaeVAli72TiclYlEG5%2Fuploads%2Fgit-blob-8198e877c7d25dae54687dda8154e84e9e877274%2Fstudio2-configuredevice.png?alt=media" alt="Configure Device dialog for a Go before connecting, with Connect device, Scan device again, and recovery guide controls"><figcaption><p>Select Connect device to enable the available configuration controls.</p></figcaption></figure>

### Connect your Go to Wi-Fi

A Wi-Fi connection lets your Go receive holograms from [Looking Glass Blocks](/software/looking-glass-blocks.md) or the [Go mobile app](/getting-started/looking-glass-go/using-the-mobile-app.md) using your Looking Glass account. Studio sends the network settings to the Go over USB, so you can complete this setup from your computer.

{% hint style="warning" %}
Cloud sync replaces the Go's active playback list with the playlist from your account. Content synced locally from Studio will stop appearing in standalone playback. If the Go is already linked to an account, this can happen as soon as it reconnects to Wi-Fi.

Your media and playlists in Studio on your computer remain available. A retained Studio playlist on the Go can be [restored for local playback](#restore-your-locally-synced-content), or you can sync it again from your computer. Connecting to Wi-Fi does not upload your Studio library to Blocks.
{% endhint %}

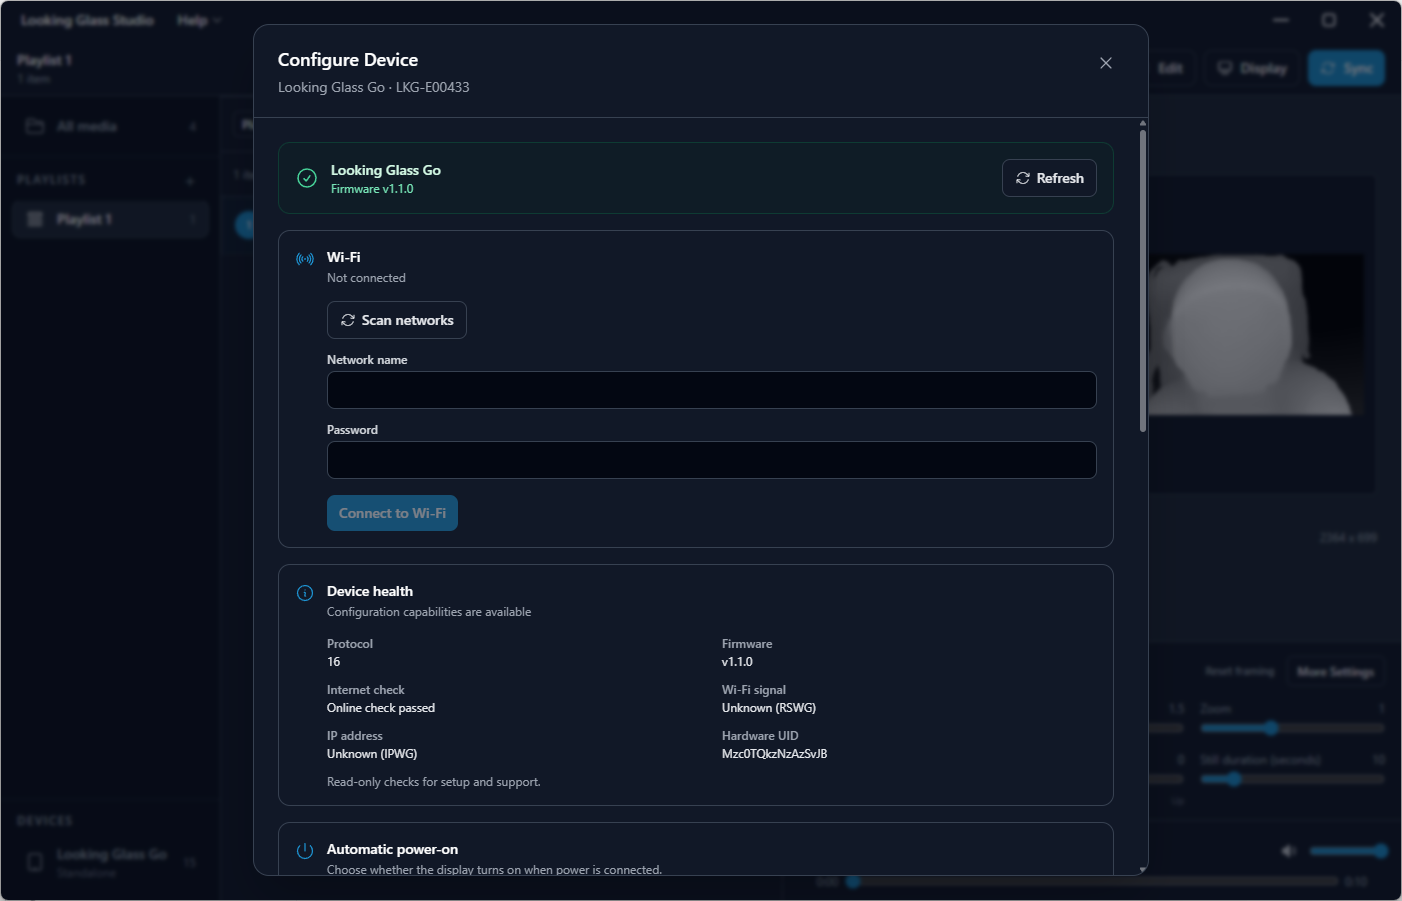
1. In **Configure Device**, find **Wi-Fi**. If the Go is already connected, select **Change Wi-Fi…**.
2. Select **Scan networks** and choose your network. You can also enter the **Network name** manually, using **Other network…** if a network list is shown.
3. Enter the network **Password** and select **Connect to Wi-Fi**.
4. Wait for the Wi-Fi status to show that the Go is connected. Use **Refresh** if needed, and check **Device health** for its internet connection status.

<figure><img src="https://2252206271-files.gitbook.io/~/files/v0/b/gitbook-x-prod.appspot.com/o/spaces%2FPuCaeVAli72TiclYlEG5%2Fuploads%2Fgit-blob-e320717129061768add10245f594d20a170f3513%2Fstudio2-connecteddevice.png?alt=media" alt="A connected Go in Configure Device with Wi-Fi network scanning, network name and password fields, and Device health information"><figcaption><p>Once the device is connected for configuration, you can enter its Wi-Fi settings and inspect device health.</p></figcaption></figure>

### Connect to Blocks or the Go mobile app

If your Go is already linked to the account you use in Blocks and the Go mobile app, reconnecting it to Wi-Fi allows cloud sync to resume. To link it or change its account:

1. Keep the Go connected over USB and confirm that it has Wi-Fi and internet access.
2. Scroll to **Blocks** in **Configure Device** and select **Connect to Blocks**, or **Reconnect/change account** if it is already connected.
3. Read the warning about replacing the active Studio playlist and confirm. Signing in with a different account moves the Go to that account.
4. Complete the sign-in in your browser using the same Looking Glass account you want to use in Blocks and the Go mobile app, then return to Studio.
5. Wait for **Connected to Blocks**. If Studio offers **Check Blocks connection**, use it to check whether setup has completed.

You can then manage your cloud holograms and select a playlist for the Go in Blocks or the Go mobile app. See [Managing Playlists](/getting-started/looking-glass-go/using-the-mobile-app.md#managing-playlists), including its **Syncing Playlists** tab, for the account-based workflow.

### Restore your locally synced content

To return to the Studio playlist after cloud sync has replaced the active playback list:

1. Reconnect the Go to your computer using the included **USB-C-to-USB-C cable** and open **Help > Configure Device**. Select **Connect device** if prompted.
2. Scroll to **Blocks** and select **Restore Studio playlist**.
3. Read the confirmation, then select **Restore Studio playlist** again. This forgets the Go's saved Wi-Fi networks and reactivates the retained local Studio playlist so cloud sync cannot immediately replace it again.
4. Keep the Go connected until Studio confirms that Wi-Fi is disconnected and the Studio playlist is active again.

This leaves the Go linked to your Blocks account. Reconnecting it to Wi-Fi can resume cloud sync and replace the active local playlist again.

Restore is available when Studio can identify a retained local playlist on the Go. If Studio asks you to eject or unmount the Go volume and scan again, follow that prompt while keeping USB connected. If no restorable playlist is available, or Studio cannot identify which one to use, sync the desired playlist again from your local Studio library.

### Other device settings

* **Automatic power-on**: choose whether the display turns on when power is connected, and set an optional delay. Select **Save power setting** to apply the change. This is useful when you want the display to start without pressing its power button.
* **Device health**: review the Go's firmware and network information to help diagnose connection issues. Some values may be unavailable on older firmware.
* **Firmware updates**: check the installed version and update guidance, or open the manual update guide if the Go cannot complete an automatic update.
* **Recovery and diagnostics**: open instructions for collecting Go logs or repairing display detection. Factory-reset options are also available here; a factory reset clears settings and content and is separate from **Restore Studio playlist**. Use the playlist restore control when you want to return to local playback.

<figure><img src="https://2252206271-files.gitbook.io/~/files/v0/b/gitbook-x-prod.appspot.com/o/spaces%2FPuCaeVAli72TiclYlEG5%2Fuploads%2Fgit-blob-f19d7ef375d8e58160585137eb85048f843ab8da%2Fdivider.png?alt=media" alt=""><figcaption></figcaption></figure>

## Export a hologram

To save a supported hologram as a file, select it, open **Edit**, and choose **Export HOP**. A HOP packages the hologram for import into Studio.

Convert or classify ordinary source media before exporting. Photoset HOP export is not available in this alpha.

<figure><img src="https://2252206271-files.gitbook.io/~/files/v0/b/gitbook-x-prod.appspot.com/o/spaces%2FPuCaeVAli72TiclYlEG5%2Fuploads%2Fgit-blob-f19d7ef375d8e58160585137eb85048f843ab8da%2Fdivider.png?alt=media" alt=""><figcaption></figcaption></figure>

## Troubleshooting

Open **Help > System Info** to review the app version, computer hardware, graphics, and device connections. Use **Copy System Report** when sharing these details with support.

<figure><img src="https://2252206271-files.gitbook.io/~/files/v0/b/gitbook-x-prod.appspot.com/o/spaces%2FPuCaeVAli72TiclYlEG5%2Fuploads%2Fgit-blob-4fb3fabfb5a741e3155774ddca822d39abf25b4b%2Fstudio2-systeminfo.png?alt=media" alt="System Info showing the Studio version, operating system, memory, graphics adapters, and a Go ready for USB transfer"><figcaption><p>System Info brings together the application, hardware, and connection details used for troubleshooting.</p></figcaption></figure>

### Studio does not detect my display

Confirm that the display is powered on and that its required USB and video connections are in place. For live playback, check that Go or Portrait is in **Desktop Mode**. Open **Display > Connection details** or **Help > System Info** to inspect the connection.

### Sync is disabled

Check that Studio detects a Go or Portrait, that the selected source contains media, and that processing has finished. Follow any mode-switching or media-preparation instructions in the Sync panel.

### The depth looks reversed or the subject is blurry

Check **Media interpretation** first. For imported RGBD, confirm **Depth position** and try **Invert depth** if near and far are reversed. Adjust **Focus** to bring the subject toward the screen plane, and reduce **Depthiness** if the effect is too strong.

### Conversion fails

Open the item to read its processing error and use the retry control if available. Check **Help > System Info**, then try a small JPG or PNG to see whether the issue is specific to the original file. A recognized video extension does not guarantee that its codec can be decoded on your computer.

If the error points to AI processing or GPU compatibility, try the FP32 depth model:

1. Wait until no media is queued or processing; Studio disables model changes while the queue is active.
2. Open **Help > Settings > Advanced**.
3. Under **AI model precision**, select **Use FP32 Model**.
4. Review the memory and storage notice, then select **Download and Use FP32**. An internet connection is needed if the model has not already been downloaded.
5. Wait until Studio confirms that the FP32 model is downloaded and selected, then retry the failed conversion.

<figure><img src="https://2252206271-files.gitbook.io/~/files/v0/b/gitbook-x-prod.appspot.com/o/spaces%2FPuCaeVAli72TiclYlEG5%2Fuploads%2Fgit-blob-f7a5265f4edbdecf9ed51b5e1ab44e02aa32d6c6%2Fstudio2-advancedsettings.png?alt=media" alt="Advanced Settings with GPU preference and AI model precision, including the Use FP32 Model button"><figcaption><p>Use Advanced Settings to choose a GPU preference or download and select the FP32 depth model.</p></figcaption></figure>

FP32 can help with model compatibility, but uses more storage and system and GPU memory than the default FP16 model. It does not fix an unsupported video codec. The selection applies to future conversion attempts; existing converted media stays as it is.

To return to automatic model selection and delete the downloaded FP32 model, select **Remove FP32 Model** in the same settings section. Studio can still choose FP32 automatically when the selected GPU cannot use FP16.

### I edited media after syncing it

Your local changes do not automatically update the standalone copy. Sync the updated media again and check the source and add/replace behavior before starting.

<figure><img src="https://2252206271-files.gitbook.io/~/files/v0/b/gitbook-x-prod.appspot.com/o/spaces%2FPuCaeVAli72TiclYlEG5%2Fuploads%2Fgit-blob-f19d7ef375d8e58160585137eb85048f843ab8da%2Fdivider.png?alt=media" alt=""><figcaption></figcaption></figure>

## Support

If you have any feature requests or issues and need support, please contact us at <support@lookingglassfactory.com> or join our [Discord](https://look.glass/discord).